
Picking a compatible projector to use with the Lightform LFC to begin projection mapping can be daunting. To make it easier for you to get started, we’ve detailed what considerations you should consider when picking a projector. Recommending projectors can be tricky business as models change quite frequently, but these core features will help you get the most out of your Lightform LFC Kit.
The Basics
Choosing the right projector is going to revolve around brightness and image size. As brightness and image size increase, so does the price of a projector. As you begin your search for a projector to pair with your LFC, you should expect to spend at least $500 for a new projector. Top-of-the-line professional units can easily run into the tens of thousands of dollars, and large-scale projection mapping projects can employ dozens or even hundreds of these high-end units. As the number of available options continues to grow, selecting a projector has not become any easier. We hope to demystify some of the terms and features to help you effectively narrow down your search. Here are a few things to consider when selecting a projector for your LFC.
Table of Contents
Quick Tip: Helpful Resources
Here are a few resources we use internally to select the right projector for our projection mapping projects.
- Lightform’s Projection Mapping Calculator is a useful resource to help you determine the brightness necessary for your installation.
- Find a Projector search tool via the Projector Central website makes it easy to find a compatible projector for the LFC. We have pre-filled in the search tool with the HDMI and throw ratio requirements to narrow down your choices for finding a compatible projector for the LFC.
- Projector Throw Distance Calculator via the Projector Central website helps determine image size and throw distance.
Projector Requirements
1. HDMI Input
2. Contrast Ratio, Black Levels, and Projection Mapping
The contrast ratio and black levels of your projector are one of the most important elements to consider for projection mapping. We recommend a minimum contrast ratio of 10,000:1, particularly if you intend to project anywhere relatively dark. Higher contrast ratios will give you better results, and greater flexibility in dark situations, but will also increase the price.
Why does it matter?
Traditional projection, whether in a cinema or in your living room, emphasizes a rectangular image frame. Projection mapping, on the other hand, turns any 3D surface into an image frame. Projection mapping is like many special effects and compositing techniques; it relies on black background areas to selectively illuminate your scene. No matter how your projector creates an image, it cannot produce or project darkness, it can only attempt to divert or block light from illuminating the dark areas of your image.
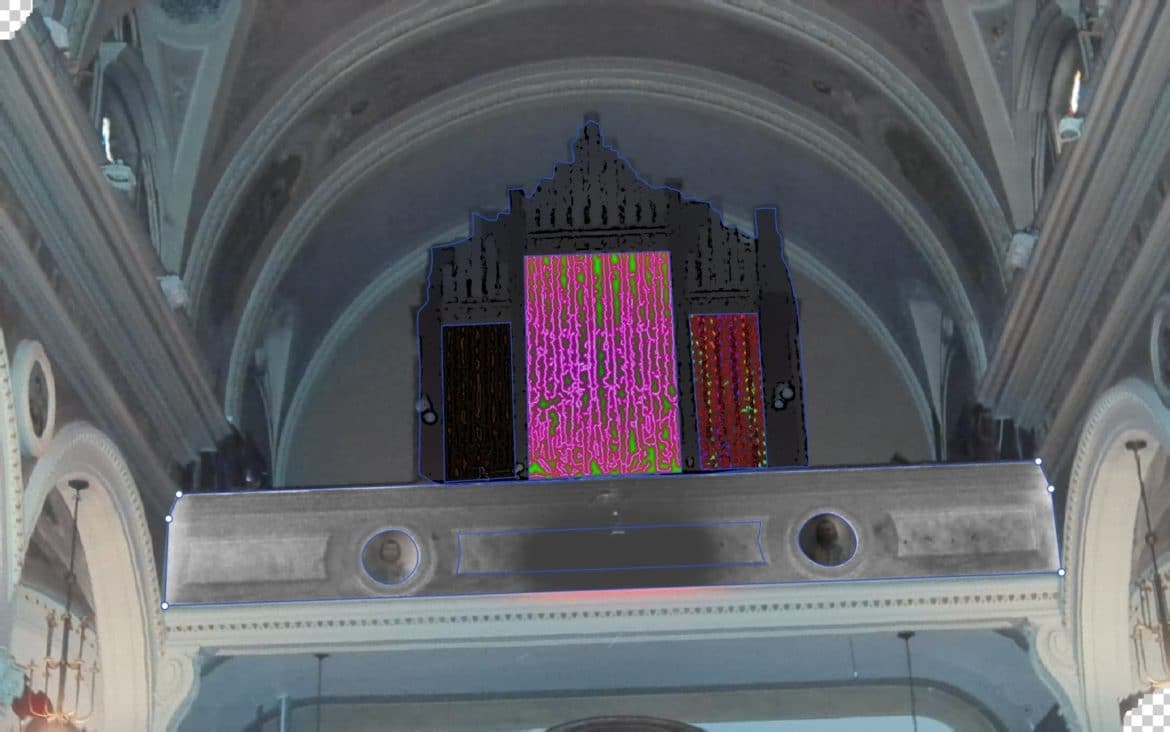
A scan in Lightform Creator with surfaces and effect.
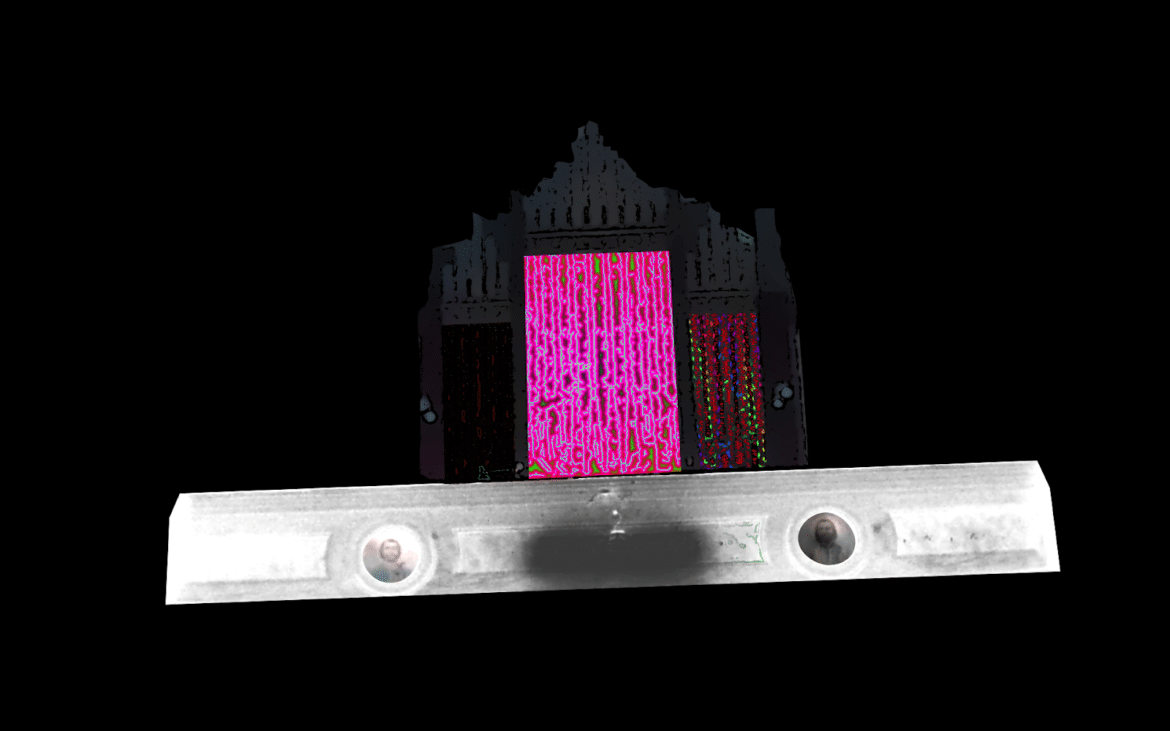
The published Lightform video being played by the projector.
Some projectors can block light better than others, which results in higher contrast images and deeper black tones. Projectors that do not block light as effectively produce flatter, more washed out images, especially in dark environments. In a cinema application, you have the option to use specialized high gain black screens to compensate for a low contrast ratio, but in most projection mapping situations, this will not be the case.
The contrast levels of your projector will affect how visible the edges of your image frame will be when projecting black video, and how much your projection will “pop.” If your projection is significantly brighter than the ambient lighting, this image boundary will be more apparent with a lower contrast ratio, particularly when projecting onto flat surfaces. You can always add more ambient light to compensate, but a higher contrast ratio will help avoid some of these situations and make your projections more vivid in general.
Visible projection frame in low light using an Epson 1060 with 15000:1 Contrast Ratio and 3100 lumens.
3. “Brightness” - Lumens and More
To better understand projector brightness there are a few other concepts to familiarize yourself with. There is more to brightness than just lumens. Learn more about the other elements of brightness in our blog about lumens, luminance, illuminance, flux, lux, and foot-lamberts.
4. Throw Ratio and Lenses
At this point we’ve talked about lumens and lux and how they relate to the illumination levels of your projected image at different sizes, but we haven’t explained how to determine the size of your projection, or how close or far your projector can be to achieve that image size.
The projector lens is a central component of creating a projected image. Similar to camera lenses, projector lenses are designed for specialized uses. A lens that works in one scenario will be the wrong tool in another. Outside of large event and venue projectors, most projectors are manufactured to be used in medium and large rooms. Short throw projectors are made with wide lenses designed to be placed close to the image plane and create a large picture frame. Long-throw projectors are designed to be placed at a distance while still creating an equivalent size frame.
Short and long-throw projectors are determined by throw ratio. To fully understand how and why Lightform works with these different projector types, we need to understand what Throw Ratio is.
Throw Ratio is defined as the size of your projected frame in relation to the distance between your frame and the projector. Like any ratio, it’s a simple division formula, the width (W) of the image frame is divided by the distance (D) between the frame and the projector. You will sometimes see Throw Ratio, or TR, written as a traditional ratio (e.g., 1.5:1), but oftentimes TR specs will exclude the :1 at the end.
The lower the TR number, the wider the picture frame, or the shorter the projector’s throw.
A projector with a throw ratio of 0.5:1 will create a frame that is twice as wide as the distance between the projector and the wall; at a 1m distance, the frame will be 2m wide, at 1.5m distance, the frame will be 3m wide, and so on. A projector with a throw ratio of 2:1 at a 1m distance will create a 0.5m wide frame, at 1.5m, the frame will be 0.75m wide, at 2m distance, the frame will be 1m wide, etc.
Using Throw Ratio
Using the throw ratio equation and its variations is essential when selecting the right projector for your experience – it’s important to consider the positioning of your projector and the size of the image you’d like to project (or the size of the scene you’d like to cover). With the throw ratio equation, you can determine:
1. The ideal throw ratio given the setup of your experience
TR = TD / IW
(Throw Ratio = Throw Distance / Image Width)
2. Where to place a projector given its throw ratio & your projected image size
TD = TR x IW
(Throw Distance = Throw Ratio x Image Width)
3. The width of the image a projector will produce given its throw ratio & throw distance
IW = TD / TR
(Image Width = TD / TR)
Many projector lenses are capable of optical zoom. They don’t have a fixed throw ratio but rather an adjustable one to give you more flexibility to work within your space’s physical constraints. These will be listed as a range, usually with two decimal points (e.g., 1.21-1.56). The greater that range is, the less constrained you will be when choosing your projector’s physical placement, so if you want to make sure you have some flexibility in your installations, that number might be a little more important to you. When looking at higher-end projectors, many of them have interchangeable lenses, which will give you a lot of options to rent or buy lenses with different throws as necessary. Be aware that an interchangeable lens feature can drive up the cost of these systems as they are not always included with every listing.
The Lightform LFC Kit works with projectors having a wide range of throw ratios, from 0.5:1 (short-throw) to 2:1 (long-throw). Two factors determine the throw ratio range that is compatible with the LFC.
Field of View – Lightform LFC’s 4K camera reads a series of visible structure light patterns during the scanning process. At each stage of the scan pattern, Lightform is recording the position of every projector pixel it can see and determining its position within the scene. With short-throw projectors, the LFC’s camera field of view, or FOV, is the limiting factor. If the throw ratio is lower than 0.5:1, the projector image will be too wide for the LFC camera; if the projector image extends beyond the edge of the camera frame, the LFC camera will be unable to detect and register the light from the full scene on its sensor.
Camera Sensor – For long-throw projectors with a throw ratio above 2:1, the 4K sensor on the LFC camera defines the upper limit of optimal compatibility. Lightform Creator’s scans and projects have a maximum resolution of 1920×1200 pixels. Lightform LFC’s 4K camera sensor has a resolution of 3840×2160 pixels, or roughly four times as many pixels as it is responsible for recording during a scan. When the throw ratio of a projector exceeds 2:1, the projector image will be visible to less than ¼ of the available 4K camera sensor pixels (i.e. less than 1920×1200 pixels) resulting in a scan resolution that is lower than the projector’s native resolution.
It is possible to use Lightform LFC with out-of-spec throw ratios beyond the 0.5:1-2:1 range by moving the LFC closer or further away with a long HDMI cable, but ideally, the camera lens should be on the same plane as the projector lens. During the scanning process, the projector lens and the LFC camera lens are essentially acting as two eyes to produce stereo vision. As the difference between the two lens planes increases, the fidelity of the depth disparity data will decrease, which will result in some effects and selection tools not behaving as intended.
It is also possible to modify the LFC camera to accept C and CS mount lenses, which will allow you to change the camera’s field-of-view to better match an out-of-spec throw ratio. This will give you better results than moving the LFC camera, but the conversion and lens will cost more than a long HDMI cable.
5. Throw Distance
Throw distance is the minimum and maximum distance your projector will project in focus. The focusing range of your lens constrains your physical placement options. The minimum distance is how close your projector can be without being out of focus, and the maximum is how far you can be without losing focus.
6. Resolution and Aspect Ratio
Like cameras, televisions, smartphones, and pretty much anything with a screen, projectors come in a wide range of resolutions. Resolution is defined as the width and height dimensions of a digital image in pixels. A pixel is the base unit of modern digital imagery, a discrete point of color and brightness that can be individually addressed as one small part of the larger total image. The higher the number of pixels you have to work with, the more detailed your images will appear.
As you research projectors, you will encounter resolutions listed both in pixel dimensions and also their marketing equivalents, VGA (640×480), SD (720×480), HD (1280×720), Full HD (1920×1080), WUXGA (1920×1200), 2K (2560×1440), UHD/4K (3840×2160) and a few others.
Lightform is compatible with a wide range of projector resolutions and will generate scans and published projects with a resolution up to 1920×1200 (WUXGA). Higher resolutions are one of the features that will bring up the overall cost of a projector and may be worth considering if you intend to work on large scenes or with small text.
7. Pixel Density
The screen you’re reading this on likely has an incredibly dense pixel array, no matter what its resolution is. More than likely, it’s at least 1920×1080, if not higher, but those pixels are so small that you can’t distinguish them individually without magnification. Digital projectors create images in standard video resolutions but enlarge them with optical lenses. As a result, individual pixels are much larger than on a phone or monitor. They are more readily perceived at close distances, a phenomenon known as the “screen door effect” because the space between pixels resembles the grid mesh of a physical screen door.
Most large-scale projection mapping projects maintain pixel density by blending multiple high resolution projectors together. If you’ve ever seen video mapping on a large building facade, the total resolution of that projection is significantly larger than any individual projector is capable of producing. Instead, hundreds of thousands of dollars worth of high-end projectors are combined using software to create one enormous seamless image.
8. Lamps, Lasers, and LEDs
Lamps, laser and LED engines are systems that use optics to split a beam of white light into different colors. Any number of lamp types can create white light (there are quite a few varieties at this point) but they all need replacement after a few thousand hours. For the budget-conscious projector hunter, this means that you can sometimes find used projectors for sale or auction at a steep discount that only need a new lamp installed. However, the newer Laser and LED light sources have some distinct advantages.
Instead of splitting white light into three channels, these projectors start with the RGB channels already separated. In other words, they can reproduce more accurate and vibrant colors with higher contrast. They are also more power-efficient, brighter, and less light is lost to the color-splitting optics resulting in higher contrast and darker blacks. On top of that, they do not require lamp replacements. Most traditional projector lamps have a life expectancy of a couple of thousand hours and have to be replaced. Laser and LED projectors, on the other hand, are usually rated to last around 20,000 hours or more, saving time and money on maintenance.
Laser projectors have also breathed life back into the 1 Chip DLP system. Since they create RGB channels at the light source instead of needing a spinning color wheel, the Rainbow Effect – an artifact of the rapid switching between color channels, where you may see flashes of color in parts of the image with quick movements or high contrast – is no longer an issue, so if you see a 1 Chip DLP Laser projector, it might suit your needs just fine.
Some Laser projectors use a Laser Phosphor as a light source, which still relies on mirrors and color wheels to create an image. A blue laser (and sometimes a second red laser) hits a phosphor wheel, which creates yellow light when the laser photons collide into it, and that yellow light is then routed through the optical engine. These projectors don’t have all the color reproduction advantages of RGB Laser and LED systems but are still brighter and more efficient with no bulb replacements.
Digital projectors use one of two kinds of imaging chips to turn the video signal from an HDMI cable into a projected video image, 3LCD and DLP. With a couple of exceptions, they will both provide good results with Lightform.
DLP, or Digital Light Processing Chip, creates an image using a DMD, an array of thousands of micro-mirrors that can switch very rapidly between reflecting light towards or away from the lens. Unlike a Liquid Crystal, the micro-mirrors on a DLP chip are a binary on/off output. To create the correct gradations of brightness, multiple mirrors will be assigned to one image pixel, or the mirrors will switch on and off faster than the refresh rate of the video.
The earliest DLP systems used a single Chip DLP configuration, dividing white light into red, green, and blue with a color wheel and then reflecting each color channel off a single DMD one after another. Because the colors are flashing rapidly between color channels instead of being recombined, 1 Chip DLP projectors with a color wheel are prone to the previously discussed Rainbow Effect. Not everyone experiences this the same way, but it will show up on video recordings and still photos. Searching projector reviews for Rainbow Effect is a good habit to get into, and it’s recommended one avoid 1 Chip DLP projectors with color wheels.
10. Vertical Offset
Vertical Offset is another feature of projector optics to be aware of when picking a projector. Most projectors are designed to sit on a surface or hang from a ceiling and create a rectilinear frame towards the center of a wall. To account for this, many of them have a 100% Vertical Offset (i.e., shifting the projected frame slightly higher versus directly straight ahead). With a 100% Vertical Offset the bottom of the projected frame will line up with the center of the projector lens, and the top of the projected frame comes out of the projector’s lens at an upward angle. A 0% vertical offset means the beam goes straight out of the lens like a flashlight and the center of the projector frame is in line with the projector lens.
Some projectors have more extreme offsets for particular situations. Higher-end projectors often have a Lens Shift feature, which will allow you to change the Vertical Offset and Horizontal Offset allowing you to move the frame around without distortion. Lens Shift is a great feature to have in physically constrained installations. You can make a vertical offset work to your advantage by installing projectors upside down and illuminating your scene from above. Minimizing occlusion of the projection as people pass in front of the projection surface makes ceiling-mounted projectors a favored installation approach in traditional situations as well as indoor projection mapping
Final Thoughts
There are many factors to weigh when purchasing a projector, and we by no means have covered them all, but we’ve found these have the greatest impact on successful use of Lightform projection mapping. To learn more about specific projectors we recommend conducting research at projectorcentral.com. If you’d like to learn more about Lightform we have several articles in the Lightform Guide that can help you bridge this knowledge to use of Lightform products.
~ Sean Servis
Note:
As of August 12th, 2022, Lightform is no longer in business and is no longer providing technical support for the product. Please refer to the Lightform Guide and FAQ for self-help resources.
